Tuesday, 29 January 2013

MKIII Tactical Unit: BASES II

Hi to everyone!

As I said, I show you the bases ended, maybe I'll do some tweaks on them, I think they're too darker, but this army will represent the Istvaan III slaughter and I think the dark colors give to the models the ambience that I'm looking for. 

Dust and ashes, blasted trenches, tangle wire barricades and broken fences is all I'm searching on this world eaters bases.

I varnished them with mat varnish but how you can see, some of them have been left brighter than expected, I've payed the hazing with this varnish, next time I'll apply less quantity over the models.

Maybe the color of the sticks isn't the appropriate, I'm thinking to repaint it in a beige color with a black ash stains due to the orbital bombing.

Broken barricade
Broken fence
Broken fence
Broken fence

Broken lamp post

Broken fence
Destroyed tank leftovers
And the two first members of this tactical unit, they were already finished, but they lacked the base and the weathering powders on the legs.


I prefer the first model I've taught due to the shoulder pads and the knees. On the first, the knees and shoulder pads haves a metal details that the second does not have.


And again you can appreciate the brightness due to the mat varnish I used, shame on me! On the next models I'll not use the same or I'll use less quantity over the model.

See you soon!


MKIII Tactical Unit: SHOULDER PADS

Hi to everyone!

At this moment I'm painting the shoulder pads of this world eaters, I've painted them using an airbrush.

The process to paint them is the following:

I've undercoated with chaos black all de shoulder pads, then I've used a Vallejo Model Air Dark Blue for the first layer with airbrush.
The advantage using an airbrush is that you only have to do two step for a great highlighting effect on the figure. I've only added a little bit of white to blue directly in the airbrush mixture jar and then you can have a perfect blur between layers. I repeated the adding white step on the mixture 3 more times to have more bright light at the end. The blur over the blue layers is perfect you can't see any abrupt colour jump between blues.


I can't wait to see those over an Astartes shoulder, I think that the highlight effect is almost good.

I want to show to all of you my airbrush (sorry about the picture):


It's a Ventus 0.25 Titan model, it has a 0,25 mm output painting stream. Here you are the URL (example url, if you are interested on it you can find some places cheaper than that): http://www.aerografia.com.es/tienda/product_info.php?products_id=571&language=en

The specifications of this airbrush are the followings:

- Double Action Airbrush.
- Deposit of gravity of 9 ml.
- Needle and nozzle of 0.25 mm.
- Air flow regulator.
- Regulatory needle path.

And this is my air-compressor:


I can't say what model it is at this time, but I will post it. The only things that I can say are that it has an air flow regulator and it isn't noisy.

That's all now, this afternoon I'll post the pictures of ended bases.

See you soon!

Friday, 25 January 2013

MKIII Tactical Unit: BASES

Hi,

I've ended the bases, well... I've ended the bases preparation to be painted.

You can see on the pictures what I've done:

1.- I've used cork sheet for the stone on the base, I' randomly broken the cork to have different sizes of stone  in each base.

2.- Using the rest of one Chaos Rhino, bits and matrix included, I've created the broken lamp post, and different sizes of broken fences using the Games Workshop  tangle wire.

3.- I've put some GW sand on the edge of the bases to homogenize the stone.


Fence in a close up

Broken lamp post close up


The next step will be the coating of the fence post and lamp post with liquid green stuff, to create an irregular effect on the posts surface.

See you soon.


Wednesday, 23 January 2013

ANGRON: THE END

Well folks! that's it! I've ended this pretty model!

I only could say that is the best model that I've ever painted!! The dedication and the time I've spent painting it worth it!

You can see the weathering powders effect on the cape, I'm proud of it! Brings to Angron a sensation off dirtiness due to the brutality of Istvaan III battle.


Well dudes, the next project will be a world eaters tactical unit, about 10 space marines!!!

The first post will be the bases! I'll show step by step my bases creation!!

see you soon!

Tuesday, 22 January 2013

ANGRON: PART IV

Hello people!!! Almost ended!!! 

I've painted the arms and the chainaxes! I didn't painted the blood correctly on the chainaxes because I'm wating for the model to be barnished wit mat barnish. Then I'll apply a new blood technique on chainaxes!


You can see this chainaxe is not yet finished! blood effect still remaining to be painted!


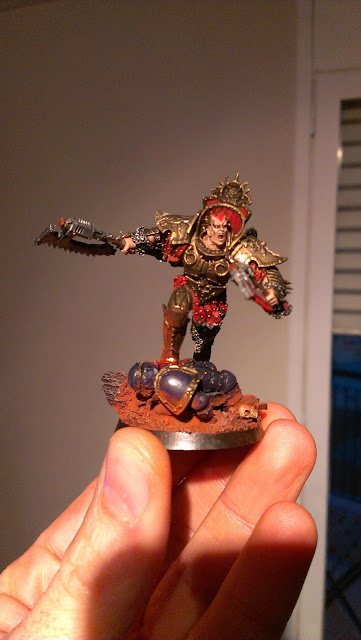
I'm really proud of this model and my improvements in painting skills, I've learnt the use of weathering powders (maybe this model is not the most appropriate to try a new technique, but :P) and I've applied a new painting way, the glaze painting, it's very costly but worth it!!

Well dudes, the next post will be the last Angron post! I'm considering to bring that model to some painting contest!!

Sunday, 20 January 2013

ANGRON: PART III

Hi dudes! 

Here it is, my first experience with weathering powders! they are awesome!! really, I love the effect of this stuff. I used vallejo pigments (they are the same as the forgeworld weathering powders), I used a powder fixer, is like alcohol for injuries, you put this first and then the powder as much you will!!


I almost finished the job, I've decided that a loyal emperor's children will be the astartes who Angron is crushing!! I hate those guys!!

see you later!

Friday, 18 January 2013

ANGRON: PART II

Hello people! new advances on ANGRON


I've ended the face, the skirt and all the metals  I've painted the face using a base of tallarn flesh, ogryn flesh shade, first highlight using only tallarn flesh, and the rest of the lights using a mixture of tallarn and bleached bone.

I used scab red, mechritte red and blood red for the tongue. And the skirt is the same thing like the tongue, scab red, mechritte red, the a shade of nuln oil, highlight with mechritte again and at last one layer of blood red.

And now, the progress of two arms!


The next step will be the base, I will try the weathering powders for first time!

see you soon!


Wednesday, 9 January 2013

ANGRON: THE RED ANGEL


Now I'm painting this........

ANGRONTHE RED ANGEL
I really love that model, it was a Christmas gift from my girlfriend, here you are, Angron ripped to pieces over my work-desk:

A lot of work  here :|
And the first picture of Angron WIP:

LOT OF JOB TO DO HERE
I've used a black coat for all the model, then Vallejo Model Color Bronze, after that, a layer of Citadel Shade: Seraphim Sepia, when it dries, apply another layer using a lot of shade, we are looking for a great contrast in that armour.

Then dry-brush with Bronze again, light dry-brush, after that, nuln oil shade for all the armour when it dries, very light dry-brush of Bronze again, then light dry-brush of boltgun metal and at last lightly light dry-brush of mithril silver.

The next step, the face and the skirt!

see you soon!


The Beginning

Hi to everyone! this is my first post in my painting blog!

My target will be paint a W40K army, specifically a 2000 point pre-heresy world eaters army (maybe I will include some units of Sons of Horus or Luna Wolves I haven't decided yet).

At this moment I only have images of two marines of my first squad: